Dodge Charger: EXTERIOR LIGHTS / High/Low Beam Switch, Automatic High Beam — If Equipped
High/Low Beam Switch
Push the multifunction lever toward the instrument panel to switch the headlights to high beams. Pulling the multifunction lever back will turn the low beams on.
Automatic High Beam — If Equipped
The Automatic High Beam Headlamp Control system provides increased forward lighting at night by automating high beam control through the use of a digital camera mounted on the inside rearview mirror. This camera detects vehicle specific light and automatically switches from high beams to low beams until the approaching vehicle is out of view.
NOTE:
- The Automatic High Beam Headlamp Control can be turned on or off by selecting or dese- lecting “Auto High Beam” within Uconnect Settings, as well as turning the headlight switch to the AUTO position.
- Broken, muddy, or obstructed headlights and taillights of vehicles in the field of view will cause headlights to remain on longer (closer to the vehicle). Also, dirt, film, and other obstruc- tions on the windshield or camera lens will cause the system to function improperly.
- If the windshield or Automatic High Beam Headlamp Control mirror is replaced, the mirror must be re-aimed to ensure proper performance. See a local authorized dealer.
Flash-To-Pass
You can signal another vehicle with your headlights by lightly pulling the multifunction lever toward you. This will cause the high beam headlights to turn on, and remain on, until the lever is released.
 Daytime Running Lights (DRLs) — If Equipped
The Daytime Running Lights will turn on when the engine is started and will remain
on unless the headlights are turned to the on position, the parking brake is applied,
or the ignition is placed in the OFF position...
 Automatic Headlights
This system automatically turns the headlights on or off according to ambient
light levels. To turn the system on, rotate the headlight switch counterclockwise
to the AUTO position...
Other information:
Dodge Charger 2011-2026 Owner's Manual: Programming HomeLink® To A Garage Door Opener
To program any of the HomeLink® buttons to activate your garage door opener motor, follow the steps below: NOTE: All HomeLink® buttons are programmed using this procedure. You do not need to erase all channels when programming additional buttons...
Dodge Charger 2011-2026 Owner's Manual: ENGINE BREAK-IN RECOMMENDATIONS — 3.6L & 5.7L
A long break-in period is not required for the drivetrain (engine, transmission, clutch, and rear axle) in your new vehicle. Drive moderately during the first 300 miles (500 km). After the initial 60 miles (100 km), speeds up to 50 or 55 mph (80 or 90 km/h) are desirable...
Categories
- Manuals Home
- Dodge Charger Owners Manual
- Dodge Charger Service Manual
- Launch Control
- High/Low Beam Switch, Automatic High Beam — If Equipped
- Sport Mode
- New on site
- Most important about car
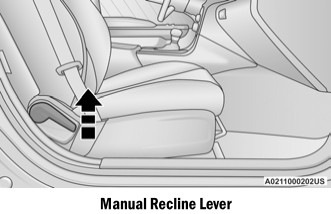
Manual Front Seat Recline
To adjust the seatback, lift the lever located on the outboard side of the seat, lean back to the desired position and release the lever. To return the seatback, lift the lever, lean forward and release the lever.