Dodge Charger: VEHICLE MAINTENANCE / Bulb Replacement
Replacement Bulbs
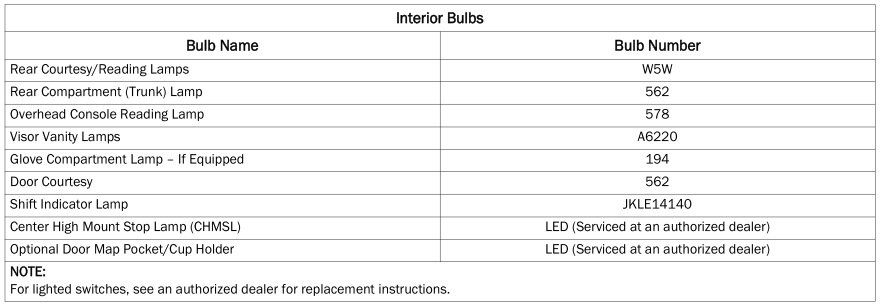
All of the interior bulbs are glass wedge base or glass cartridge types. Aluminum base bulbs are not approved and should not be used for replacement.
Replacing Exterior Bulbs
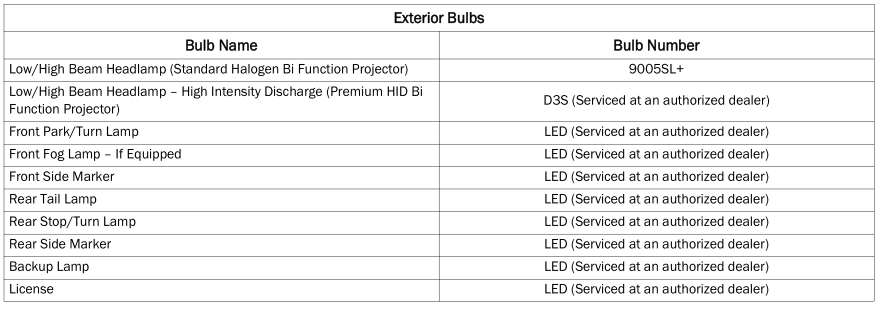
Front Low/High Beam Headlamp — Models With Halogen Headlamps
See below steps to replace:
- Open the hood.
NOTE:
Removal of the air cleaner filter housing may be necessary prior to replacing bulbs in the head- lamp assembly on the driver side of the vehicle.
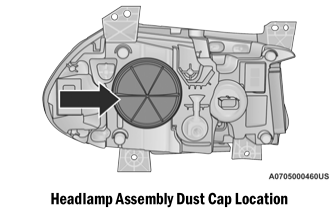
- Remove the large dust cap from the headlamp housing by turning it counter- clockwise.
- Turn the bulb counterclockwise, and remove.
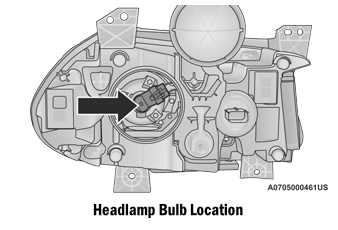
- Disconnect the bulb from the socket assembly and install the replacement bulb.
- Reinstall the bulb and socket assembly into the headlamp assembly, and then
turn it clockwise.
CAUTION!
Do not touch the new bulb with your fingers. Oil contamination will severely shorten bulb life. If the bulb comes in contact with any oily surface, clean the bulb with rubbing alcohol.
- Reinstall the access cap making sure it is seated into the housing and turn cap clockwise to engage locking lugs. Visually, you should be unable to see the blue O-ring gasket. The access cap should be uniformly seated and you should not be able to pull the access cap off without turning it counterclockwise.
CAUTION!
If the access cap is not installed correctly after bulb replacement, the lamp becomes susceptible to dust, condensation, and water intrusion. This may ultimately lead to an inoperative lamp. If the access cap cannot be installed correctly, please return to an authorized dealer for proper repair or access cap replacement if necessary.
Front Low/High Beam Headlamp — Models With High Intensity Discharge (HID) Head-lamps
The headlamps are a type of high voltage discharge tube. High voltage can remain in the circuit even with the headlamp switch off and the key removed. Because of this, you should not attempt to service a headlamp bulb yourself. If a headlamp bulb fails, take your vehicle to an authorized dealer for service.
WARNING!
A transient high voltage occurs at the bulb sockets of HID headlamps when the headlamp switch is turned ON. It may cause serious electrical shock or electrocution if not serviced properly. See an authorized dealer for service.
NOTE:
On vehicles equipped with HID headlamps, when the headlamps are turned on, there is a blue hue to the lights. This diminishes and becomes more white after approximately 10 seconds, as the system charges.
Front/Rear Side Marker Lamp
The Side Markers use LED lamps that are not serviceable separately. The Side Markers must be replaced as an assembly, see an authorized dealer.
Front Fog Lamp
The Front Fog Lamps use LED sources that are not serviceable separately. The Front Fog Lamp must be replaced as an assembly; see an authorized dealer.
Front Turn Signal Lamps
The Front Park/Turn function is part of the headlamp assembly and use LED lamps that are not serviceable separately. The headlamps must be replaced as an assembly, see an authorized dealer.
Backup Lamps
The Backup Lamps use LED sources that are not serviceable separately. The Applique must be replaced as an assembly; see an authorized dealer.
License Lamp
The License Lamp uses an LED source that is not serviceable separately. The License Lamp must be replaced as an assembly; see an authorized dealer.
Center High Mounted Stop Lamp (CHMSL)
The CHMSL Lamp uses LED sources that are not serviceable separately. The CHMSL Lamp must be replaced as an assembly; see an authorized dealer.
 Rear Interior Fuses
There is also a power distribution center located in the trunk under the spare
tire access panel. This center contains fuses and relays. Fuse cavity location and
descriptions are printed on the inside of the power distribution center cover...
 TIRES
TIRES
..
Other information:
Dodge Charger 2011-2026 Owner's Manual: Default Mode
The vehicle will always start in Default Mode. This mode is for typical driving conditions. While in Default Mode, the Engine/Transmission, and Traction will operate in their Normal settings and cannot be changed. The Steering Assist may be configured to “Normal”, “Sport”, or “Comfort” by pressing the corresponding button on the touchscreen...
Dodge Charger 2011-2026 Owner's Manual: Anti-Lock Brake System (ABS)
The ABS provides increased vehicle stability and brake performance under most braking conditions. The system automatically prevents wheel lock, and enhances vehicle control during braking. The ABS performs a self-check cycle to ensure that the ABS is working properly each time the vehicle is started and driven...
Categories
- Manuals Home
- Dodge Charger Owners Manual
- Dodge Charger Service Manual
- WHEEL AND TIRE TORQUE SPECIFICATIONS
- High/Low Beam Switch, Automatic High Beam — If Equipped
- Sport Mode
- New on site
- Most important about car
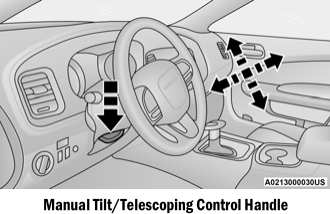
Manual Tilt/Telescoping Steering Column — If Equipped
This feature allows you to tilt the steering column upward or downward. It also allows you to lengthen or shorten the steering column. The tilt/telescoping control is located below the steering wheel at the end of the steering column.
